
Following on from the first in my mini-series of blogs for my most recent project, Melrose House – The Hall, this time, it’s ‘The Bathroom’ (as you can see, I’m keeping it simple with the titles)
When I first viewed the property from the developer, the bathroom was dull and unimaginative. The bright white walls and cheap looking vinyl flooring made the room feel cold and stark. Although the modern style bathroom suite was brand new and of fairly decent quality it didn’t give any character to the building and it wasn’t the look I envisioned for my home.

To make matters worse, the boiler for the apartment was on show, slap-bang in your eye line as soon as you walked into the bathroom, together with a dreadful grey high-gloss panel covering the pipework made from the side of a kitchen cupboard (honestly, I kid you not)

Like I mentioned briefly in my previous article (The Hall) the layout initially included a strange wasted area leading into the bathroom which provided no use whatsoever.
To make matters worse, the room had just one strange outdoor sensor light installed in the ceiling which decided to turn itself off every 10 seconds, unless however, you moved like you were dancing to the Macarena!
The lot had to go….
THE BUILD

If like me, you trawl endlessly through Pinterest looking at stunningly beautiful interiors and in this instance, bathrooms and then wonder “where do they put their stuff?” then this was my next conundrum.
First up was removing the original wall into the bathroom and incorporating the dead space into the room. I was conscious there was limited storage in the apartment plus, due to wanting to install a dishwasher into the new kitchen, the washing machine had to be relocated.


I needed somewhere to accommodate all those unsightly bathroom products, towels, bedding and in my case also the vacuum cleaner. The dead space from before would now be made into a much needed custom built storage cupboard not only concealing the washing machine but including made to measure compartments for all those life essentials.
The original bathroom suite was removed (and sold, though for next to nothing) and it was time to tackle the unsightly boiler. It wasn’t possible to relocate the boiler, so I asked my joiner to construct a faux wall to conceal it, with a door to access the boiler when needed.
On the opposite side of the room, three random shelves were boarded up to create a more streamline look to the walls and then it was time for the fun part to start…


THE DESIGN
I wanted the bathroom to be more sympathetic to the buildings history, something sumptuous and luxurious but with an edge to it.
The Victorian era (1837-1901) and in particular the later years when Melrose House was built in 1890, focused heavily on dark, moody colour palettes and floral and geometric patterns. During this era, wallpaper became increasingly popular, with botanical prints being at the forefront of Middle-Class homes.
Wallpaper became a particularly popular form of wall treatment…factory-printed papers provided a simply way to cover surfaces with pattern…geometric, floral or even scenic; oriental themes were also popular… Victorian colour tastes gradually shifted from bright and daring towards heaviness and gloom…darker and more muted colours, browns, olive greens and mauves, came to be regarded as more “tasteful.” A History of Interior Design – John Pile & Judith Gura


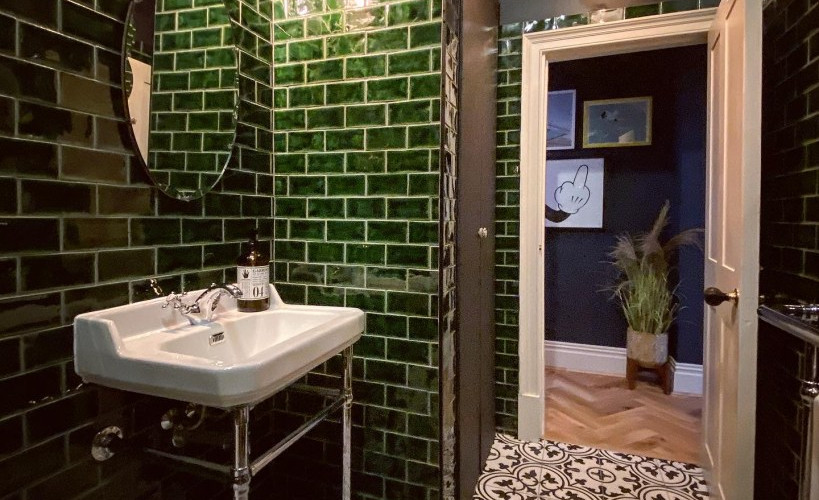
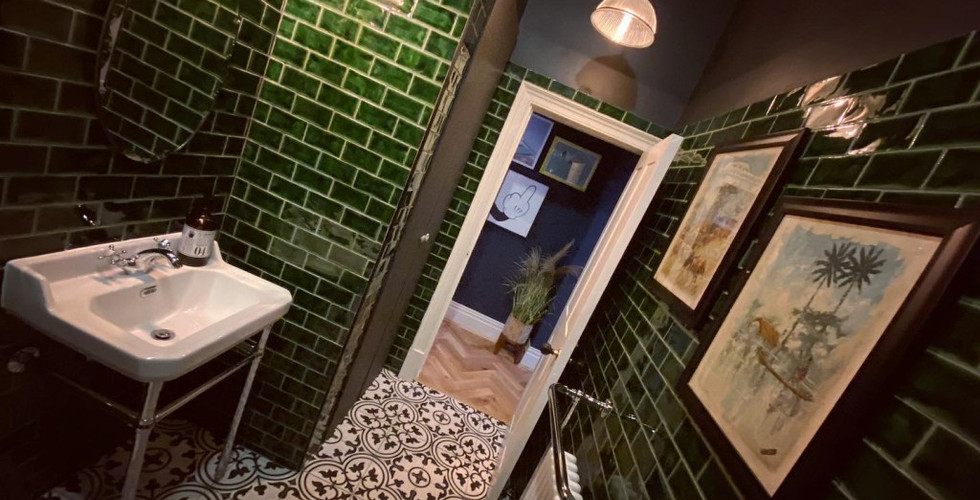
I fell in love with the strong green tiles whilst on several visits to the Victorian Baths in Manchester. This stunningly beautiful building is a fine example of Victorian design and architecture.
Planning of the baths started in 1897 with completion in 1906, the same time period as Melrose House’s first occupants, Minister Thomas H Williams and his family.
This inspiration started my creative juices flowing, below are the concept mood-board and 3-D images I created for the bathroom.


THE WALLS
The inspiration from the Victorian Baths had started my hunt for the perfect green wall tile. This was not as easy as you may think, in today’s interiors market there are endless shades and finishes with many not quite hitting the mark.

After numerous samples I finally settled on my top four with the hands down winner being the ‘Crackle Glaze Green Victorian Tile’ by Tiles Direct
Not only was the shade the perfect tone of green but with it’s rough edges and crackle glaze finish, it had an almost antique texture to it.


I knew I wanted all the walls to be tiled but I felt with the ceiling height being over 10ft, to do floor-to-ceiling tiling would be too imposing for the room.
I decided to leave just under 3ft (a little over my 6ft height) from the ceiling to give contrast to the tiles. I wanted to home in on the dark and moody fashion of the early 1900’s, so I painted this area along with the newly constructed storage cupboard and boiler unit in Little Greene’s Lamp Black.
THE FLOOR & CEILING
To compliment the green tiles and tie in the black walls, I wanted a monochrome floor. Once again I found endless samples, but finally settled on a geometric floral pattern (after the first tile supplier went into liquidation the day before delivery)

The ‘Abbey Decor’ from Porcelain Superstore tile is a classic floral and geometric design and is made from porcelain, making it tough and durable for bathroom flooring.
Once again, like the hallway the original uneven floorboards had to be leveled, this time however, using Durabase C1 Matting before the tiles could be laid.


With the ceiling I wanted to do something more striking than paint, I asked several decorators about putting wallpaper on the ceiling with all of them refusing, saying “you can’t put wallpaper in a bathroom due to steam”
I wasn’t having that, I thought in 2019 there must be a way of sealing wallpaper to make it waterproof and what do you know, there is!
Thankfully I finally got recommended a decorator who knew exactly what was needed and he set too wallpapering and then coating it in a clear decorators varnish and sealing the edges.
I ordered numerous gorgeous wallpapers samples, but narrowed them down to these five below…


During the Arts and Crafts movement of 1880-1920, the focus started to shift from machine-dominated production of home goods back to more traditional, intricate and hand-made design.
The Arts and Crafts movement in Britain was born out of an increasing understanding that society needed to adopt a different set of priorities in relation to the manufacture of objects. Its leaders wanted to develop products that not only had more integrity but which were also made in a less dehumanising way. Victoria & Albert Museum, London
One of the main influences during this time was William Morris, the famous interior designer who founded Morris & Co.
During the time Melrose House was constructed, William Morris produced hand-printed wallpapers, which focused heavily on nature and botanicals. At this time, the interior fashion for the wealthy Middle-Class’ were these signature William Morris wallpaper designs.


Morris papers began to be recommended in many domestic advice manuals and design books, including the affordable Art at Home series (1876–83). As a result they gradually began to be found in the newly built homes of the ‘artistic’ middle classes. Victoria & Museum, London
I wanted to incorporate the inspiration of the Morris designs, but to make it a little more modern. The deep shades of green and the botanical print of the ‘Exotic Fruit I’ wallpaper by Mind The Gap was the perfect choice.
These wallpapers, which are printed to order, are made in Transylvania with eco-friendly ink and have a matt finish.

THE FIXTURES, LIGHTING & ACCESSORIES
Obviously you can’t have a bathroom without the sanitary ware, the original modern suite didn’t fit with the new design, so it was all removed including the towel rail and replaced with a more traditional style by Victorian Plumbing.
White porcelain became popular during the late Victorian era, moving away from wooden fixtures which people realised were not as hygienic. Indoor bathrooms were really only seen in the wealthy Middle-Class households and they featured ornate designs and metal fixtures.
The traditional style of the ‘Keswick’ suite had the look similar to the Victorian design that I wanted to achieve but thankfully ordering direct online, kept the costs down.


With lighting being so important to the look and feel of a room, I wanted to achieve the warm white light associated with the gas lamps and ‘Edison’ eclectic bulbs of the 1900’s.
Three separate lights were installed on independent switches by GM Electrical to enable the lighting to be controlled, dependent on the mood/occasion required.
Above the basin, I chose the teardrop shaped ‘Aquila’ shade and antique silver rose fitting from Pooky. This hand blown glass shade combined with a filament bulb gives a cosy, less harsh light for above the sink and mirror. When this light is illuminated solo it creates a moody, “gas-lamp” light effect and I use it for when I have visitors or when I’m not using the bathroom practically.

For day-to-day use though, the room needed more light. I wanted to create an entrance “zone” to the bathroom and also give practical light to the new storage cupboard.
The ‘Tristan’ pendant light from John Lewis was hung from the newly installed ceiling rose to enable more light to fill the room but still keep that “gas light” feel.

The third light from Happy Homewares provides the “practical” light. This traditional glass light is fitted with three bright white LED bulbs and is connected to the extractor fan for when the bathroom is actually being used as…well…a bathroom. When the light is off, the flush design means it doesn’t appear obtrusive to the design.

Finally, the finishing touches were added, I came across two vintage framed paintings at The Pear Mill Vintage Emporium (one of my favourite places for unique finds) and teamed these with faux hanging plants from Rose and Grey and a bargain antique mirror from eBay.


And there it is, another room in Melrose House complete…


Comments